Thursday, December 15, 2011

Week of 12/19/11 to 12/22/11

The following is the study guide for the 2011 mid-term:

Graphic Design Study Guide

1.     Printing

2.     Typography

3.     Quick Printing

4.     Lithography

5.     Commercial Printing

6.     Adobe InDesign

7.     Adobe Photoshop

8.     Adobe Illustrator

9.     Packaging / Package Design

10.  Senefelder

11.  Platen for Screen printing

12. Screen Press (6-color)

13.  Safety

14.  OSHA

15.  Ink Mists

16.  MSDS

17.  Flash point

18. Decibels

19.  Personal Protective Gear

20.  Classes of fires

21. Yellow “fire” Cabinet

22.  Color codes

23.  Photoshop zoom  (how much?)

24. Direct Selection

25.  Group Selection

26.  Live Trace (Illustrator)

27.  Eyedropper tool

28.  Default colors

29.  Basic elements of design

30. Complimentary color scheme

31.  Colors -warm, cool and neither

32.  CMYK / RGB

33.  Movement

34. Shape

35. Unity

36. Color has three properties

37. HSB

38.  Serifs

39.  Script

40.  Typography

41. Typeface

42.  Lower-case letters

43.  Kerning / Leading

44.  Readability

45.  Display text / Copy

46. Typography principles (4)

47.  Font Family

48.  X-height

49.  Waistline

50.  Ascender


Graphic Design Shortcuts

Shortcuts for the Following:

Copy = Command & C

Paste = Command & V

Zoom in = Command & +

Zoom Out = Command &-

Open = Command & O

Cut = Command & X

Fit to Screen= Command & 0 (zero)

Close Window= Command & W

Save = Command & S

Print = Command & P

Paste into = Shift & Command & V


Monday, December 12, 2011

Mid-Year Exams Review Week of 12-12-11

EQ(s): How can I be successful on the Mid-year exam?

Technology Standard(s): Adobe Systems Technology

Assessments:
Formative: Completed Study Guide
Summative: Mid-Year Exam (Given next week)

Mid-Year Final Exams Review
Students will identify key developments and individuals relating to the history of the graphics and design industry and explore emerging trends and technologies.
a. Describe the development of the printing industry.
b. Identify persons with major contributions to the field of graphic design.
c. Outline the history of printing and graphic design and explain its effects on the print/design industry and society.
d. Identify and describe emerging trends and technologies.
ACCT-IGD-7. Students will identify safety and health procedures utilized in the classroom/lab environment.

Differentiation:
Students will be accomodated through modifcations. Seat proximity and location will be altered. ILP modifications will be observed and met.
Students will also be making holiday cards as enrichment for credit.

Monday, December 5, 2011

Week of 12/5/2011


All classes will be completing the final project of the fall 2011 semester. A Holiday card enrichment project will be given next week in conjunction with the exam reviews. 


The Exam Schedule is as follows:

Monday 12/19
1st and 2nd (White) Exams given
3rd and 4th  review

Tuesday 12/20
1st and 2nd (White) Exams given
3rd and 4th  review

Wednesday 12/21
3rd and 4th (White) Exams given
Students will be dismissed at 11:36 am
Bus transportation will be provided: Please make arrangements in advance.

Thursday 12/22
3rd and 4th (Blue) Exams given
Students will be dismissed at 11:36 am
Bus transportation will be provided: Please make arrangements in advance.

Sunday, November 27, 2011

Week of 11/28/11


GDP
Students will create screen printed designs
1. Develop idea
2. Transfer idea to transparency
3. Coat screens
4. Expose Screens
5. Washout
6. Block out
7. Set up press
8. Dry-cure designs


AGD
Fuel Up to Play 60 Mural (live work design)
Adv. Graphic Design
1. Translate ideas from Comp Plan to Photoshop.
2. Take, create or scan digital images.
3. Manipulate, edit and / or crop images to fit idea and space.
4. Add effects, filters and layers styles to project.

IGD
1. Demo. Illustrator Business Set
2. Open new template for Business Set
3. Create card including address, website, name, slogan and contact info.
4. Have teacher to update-give feedback
The student participates in student-to-teacher, student-to-student, and group verbal interactions.
5. Print and display on poster using constrction paper accents
6. Critique someone else's work.

Monday, November 14, 2011

Week of 11/14/2011


Intro to Graphic Design:
1. Elements and Principles discussion in relation to business set project
a. Discern appropriate use of technology in areas of color and design
choices.
2. Demo Illustrator toolset
a. Demonstrate how to log-on/boot-up, save, and print using a page layout
program.
b. Design and produce a document using desired fonts, formatting, margins,
indents, tabs, gutters, header and footer, guides, trims, folds, and proper
leading.
c. Demonstrate text alignment, element positioning, and rules of page design
for printed matter.3. Logo / Illustration
5. Adorn business set with symbols
6. Print the design.
7. Mount the work on board for display.
8. Complete the critique on your own work.
9. Critique someone else's work.


Graphic Design Production


1. Marketing Lecture and demo
2. Invent / create product and brainstorm for a new name.3. Research target market, competition and similar products
4. Create logo and slogan
5. Create product and package
6. Create AD with photo of product.


Students will learn principles of design and general layout procedures as it relates to the graphics industry. Content will cover electronic systems and software programs used in graphic design, page composition, image conversion, and digital printing. Knowledge and skills in digital design and imaging will be enhanced in a graphic communication production laboratory facility through experiences that simulate the graphic communications industry and school-based and work-based learning opportunities.
ELA10LSV1 The student participates in student-to-teacher, student-to-student, and
group verbal interactions.


Advanced Graphic Design


1. Translate ideas from Comp Plan to Illustrator
2. Take, create, alter or scan digital images.
3. Manipulate, edit and / or crop images to fit idea and space.
4. add effects, filters and layers styles to project.
ELA10LSV1 The student participates in student-to-teacher, student-to-student, and
group verbal interactions.
MM1P1 Students will solve problems (using appropriate technology).
MM3P4 Students will make connections among mathematical ideas and to other areas
Note:
Students were given a popular company to simulate live work. The students must create a new image for the company
and use this image in an Ad.

Sunday, November 6, 2011

Week of 11/7/11


AGD & GDP
Students will learn the Elements of design.
Many questions will be answered including the following:


Why are the elements of Design important?

Right. The elements of art are important for several reasons. First, and most importantly, a person can't create art without utilizing at least a few of them. No elements, no art, end of story. And we wouldn't even be talking about any of this, would we?

Secondly, knowing what the elements of art are enables us to (1) describe what an artist has done, (2) analyze what is going on in a particular piece and (3) communicate our thoughts and findings using a common language

What are the elements of Design?

In Design you've got line, shape, form, space, texture, value and color. Artists manipulate these elements, mix them in with principles of design and compose a piece of art. Not every work has every last one of these elements contained within it, but there are always at least two present.


IGP
Students will explore Copyright issues.
Students will learn the answers to the following FAQ:

What is copyright?
Copyright is a form of protection grounded in the U.S. Constitution and granted by law for original works of authorship fixed in a tangible medium of expression. Copyright covers both published and unpublished works.

What does copyright protect?

Copyright, a form of intellectual property law, protects original works of authorship including literary, dramatic, musical, and artistic works, such as poetry, novels, movies, songs, computer software, and architecture. Copyright does not protect facts, ideas, systems, or methods of operation, although it may protect the way these things are expressed.

How is a copyright different from a patent or a trademark?

Copyright protects original works of authorship, while a patent protects inventions or discoveries. Ideas and discoveries are not protected by the copyright law, although the way in which they are expressed may be. A trademark protects words, phrases, symbols, or designs identifying the source of the goods or services of one party and distinguishing them from those of others.

When is my work protected?

Your work is under copyright protection the moment it is created and fixed in a tangible form that it is perceptible either directly or with the aid of a machine or device.

Do I have to register with your office to be protected?

No. In general, registration is voluntary. Copyright exists from the moment the work is created. You will have to register, however, if you wish to bring a lawsuit for infringement of a U.S. work.

Sunday, October 30, 2011

Week of 10/31/11

GDP

This tutorial will teach you how to create a simple zoom in & zoom out animation with fade-in and fade-out effect in Flash. You can use this zooming effect on any image or text.
STEPS TO FOLLOW
Open a new flash file (Ctrl+N). The New Document window will appear. Select General panel and choose Type: Flash Document. Press OK.
If your timeline window is not open, press (Ctrl+Alt+T). Now you can see a single Layer called "Layer1" in your timeline Window.
Select the first frame. Import a background image onto stage, preferably an image of a street by clicking on File>Import>Import to Stage, or just press (Ctrl+R).
Press F8, to convert this image to a symbol. Name this Symbol "background_gr" and choose graphic behavior. Press OK. Name this Layer "bg". On the 35th frame press F6 to insert a new frame
Select the second layer. Import an image or create a shape of a car using shape tools from the tool box. Press F8, to convert this image to a symbol. Name this Symbol "car1_m" and choose movie clip (F8). Press OK. Name this Layer "car1".
Select the image(car1_m) >right click>edit in place. Now you will come to a new timeline Window called Symbol2
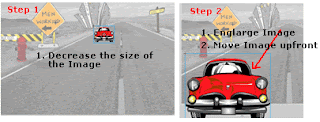
On Frame1 of Symbol2 convert the image to a graphic (car1_gr). Go to the Properties Bar>Color>Alpha>0%. In Frame5 insert a new Key frame (Press F6) and change Alpha to 100% and make the image small. Eg : Pic
Right click in between Frame1 and Frame5 and press motion tween.
Add one more Key Frame in Frame20. In this frame make the Image(car1_gr)bigger and move it out. eg:
On Frame25 insert a new key frame and change Alpha to 0% . Insert motion tween in between frame5-20 and Frame20-25. eg:
Now press (Ctrl+Enter) to view your motion tween.
Continue to do this for your other car images.
Remember to insert only ONE symbol/image in ONE new Layer only.
Congratulations! You have successfully created a Zoom In/Zoom Out animation with Fade In and Fade Out effect!


IGD


This productivity tutorial will show you who to take advantage of Illustrator’s dynamic transform effects to instantly update multiple business cards in any layout. Click link below to see video tutorial of this week's lesson.

http://tv.adobe.com/watch/visual-design-cs5/illustrator-business-cards/#translate-this-episode


Sunday, October 23, 2011

Week of 10/24/11


IGD


1. Demo. Illustrator tools
2. Open new template for :
a. business card
b. letterhead
c. envelope
d. postcard
f. notecard
g. button
3. create a business including address, website, name, slogan and contact info.
4. create a document for each of the items listed in step 2

5. print and display on poster using constrction paper accents


GDP

1. Create storyboard

2. Create and gather images (observing all copyright laws)

3. Paste all images into a new document (ensure the size-in pixels- will handle all the information).

4. Create frames for each scene

5. Add effects and "tween" where needed

6. Set duration for each frame

7. Preview in browser (like Firefox or Safari)

8. Make adjustments

9. Save optimized file

10. Complete a self-reflection checklist


AGD

Work on design in illustrator

Prepare Screens for use:

1. Coat w/ emulsion
2. let dry
3. Print design on plastic or velum.
4. Work on pre-press design

5. Expose Design


Friday, October 14, 2011

Week of 10/17/2011

AGD Advanced Graphic Design


Preparing artwork for you t-shirt is an important step. You don't need to be a professional artist to enter the screen printing field. Many people have started successful businesses even though they could barely draw stick figures. This tutorial will show you how to prepare artwork for a two-color t-shirt. Artwork can be prepared in many different computer programs. Corel Draw and Adobe Photoshop are two popular programs used by screen printers.
A two-color shirt requires two separate screens that must be predpared. The tutorial below will show you how to prepare the artwork needed to burn into each screen.
The Image


The image on the left is the design we will put on the t-shirt. This design has two colors, red and black.
Color #1 - Black


In order to print multiple-colors on t-shirts, your artwork must be separated into the different colors. We need to separate the red and black parts of the image.
The four bulls eyes on the left are actually "registration" marks. These are used to line up your multi-color jobs on the silk screen machine. This will ensure that your images print where they are supposed to when they are printed on the t-shirt.
This image would be printed off on transparency or vellum. We are now finished with this color. It's time for the next color.
Color #2 - Red


The next color to be printed is black. This is done the same way as the first color. The registration marks are also on this image.
This image would also be printed on transparency or vellum. Two separate images make one multi-color image.
The artwork is now ready to be burnt into the screen.


The Finished Product
Our finished t-shirt will look something like the one at the top of this blog.
This is the process that is used for all multi-color prints


Taken from: http://www.silkscreenbiz.com/learning/artwork.htm

GDP Grpahic Design Production


An animated GIF file comprises a number of images or frames to be displayed successively, each described by its own GCE (Graphic Control Extension), preceded by a header whose content by default applies to all the frames. Students will create an animated GIF, going from storyboard concept to finsished product.


IGD Introduction to Graphics and Design


A marketing strategy will help students in defining business goals and develop activities to achieve them. Student designers will develop a marketing plan for their unique products.
Here's How:
Describe your company's unique selling proposition (USP).
Define your target market.
Write down the benefits of your products or services.
Describe how you will position your products or services.
Define your marketing methods. Will you advertise, use Internet marketing, direct marketing, or public relations?

Sunday, October 9, 2011

"Week of" October 10, 2011


In order to be more detailed about what actually happens in Design class, I am using the instructional plans from each lesson plan.

IGD (Introduction to Graphics and Design):

EQ(s): How can I use Illustrator to create a new product for a specific market?

Technology Standard(s): Adobe Systems Software (Illustrator CS or Photo-

shop CS)


Students will learn principles of design and general layout procedures as it relates to the graphics industry. Content will cover electronic systems and software programs used in graphic design, page composition, image conversion, and digital printing. Knowledge and skills in digital design and imaging will be enhanced in a graphic communication production laboratory facility through experiences that simulate the graphic communications industry and school-based and work-based learning opportunities.

ELA10LSV1 The student participates in student-to-teacher, student-to-student, and

group verbal interactions.

ACCT-IGD-17. Students will identify and understand the differences in page

layout, raster based photo manipulation, and vector based graphic software

applications.


Instructional Activities for the week:

1. Marketing Lecture and demo

2. Invent / create product and brainstorm for a new name.

3. Research target market, competition and similar products

4. Create logo and slogan

5. Create product and package

6. Create AD with photo of product.


GDP (Graphics and Design Production):

EQ(s): What is animation? How can I identify different file format types?

Technology Standard(s): Use Adobe Systems software to create an animated gif.

ACCT-IGD-15. Students will identify and produce files utilizing different digital
formats.

Instructional Activities for the week:


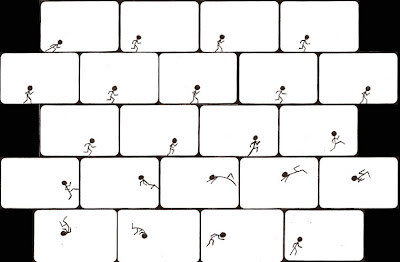
1.Create storyboard

2. Create and gather images (observing all copyright laws)

3. Paste all images into a new document (ensure the size-in pixels- will handle all the information).

4. Create frames for each scene

5. Add effects and "tween" where needed

6. Set duration for each frame

7. Preview in browser (like Firefox or Safari)

8. Make adjustments

9. Save optimized file

10. Complete a self-reflection checklist


AGD (Advanced Graphic Design):

EQ(s):

How can I create a screen printed T-shirt Design?

What chemicals are used to screen print?

How can I use multi color registration on my T-shirt design?


Technology Used: Adobe Systems Software (Illustrator CS)

Multi-color screen press technology.

Photo Emulsion technology

Instructional Activities for the week:

Work on design in illustrator

Prepare Screens for use:

1. Re-claim

2. Abrade

3. Degrease

4. Rinse

5. Dry

Coat Screens for use:

1. Coat w/ emulsion
2. let dry
3. Print design on plastic or velum.
4. Work on pre=press design


Prepare Screens for use:

1. Re-claim

2. Abrade

3. Degrease

4. Rinse

5. Dry

Coat Screens for use:

1. Coat w/ emulsion
2. let dry
3. Print design on plastic or velum.
4. Work on pre=press design


Wednesday, October 5, 2011

This week in Graphic Arts (10/4 to 10/7)

Students in ALL Classes are using various types of output processes:
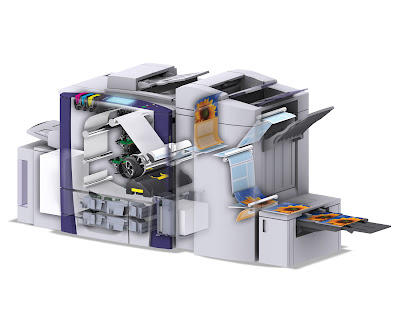
XEROX DIGITAL OFFSET PRINTING
XANTE PLATEMAKER
INK JET PRINTING


Monday, September 26, 2011

This Week In Graphic Design


Students will be contributing to the door design for homecoming in addition to their other projects


Tuesday, September 20, 2011

This Week in Graphic Design

Students are printing their projects: Output porcesses.

AGD
Printing Live Work
 designs


GDP
Printing Business Set designs


IGD
Printing CD Jewel Case designs


Tuesday, September 13, 2011

This Week in Graphic Design 9-12 to 9-16


Designers will learn about typography:

Ben Terrett, of Noisy Decent Graphics, asked his readers this question:

What typographic advice would you give a third year design student?

I read the comments with interest and here I’ve picked out a few of the most useful typography tips.

“Don’t underestimate its importance. The best ideas, the most beautiful imagery, the most harmonious colour combinations will be blighted by inferior typography. So work at it, study it.

“Look at all those great names in graphic design history; Tschichold, Schleger, Rand, Fletcher, Aicher, Muller-Brockmann; and look at their beautiful type. They understood the need to understand it.”

Taken from: http://www.davidairey.com/typography-tips-and-advice-for-graphic-design-students/